Tuesday 29 July 2014

Tutorial Tuesdays - Pound Store Finds

Welcome to Tutorial Tuesday!  It has been a while I know, but I have been busy making projects to share with you and this one today incorporates my love of paper and working with my hands.  I thought I would share with you what I have been working on lately.
Tutorial Tuesday


Here in the UK we have what is call 'Pound stores' or 99p stores in which they sell everything very cheaply, and as the name says either £1 or 99p.  I guess in the states you have your 'Dollar Tree' and I am sure that most places would have the equivalent.

You can often pick up a range of crafting items, not the best quality, but depending on what you are going to use them for can be quite effective.  I recently picked up these bags of all sorts and was attracted by the flower that was in the packet, it had a lot of waste and off cuts that would normally be recycled but some bright spark has realized that if they bag them up someone will buy it.

Anyway, it came with lots of different type of paper, flower off cuts, a bag of beads, foam and as you can see strips of paper.

Because of my love of paper and making things I thought it was a good idea to see what I could create with the contents of the bag.  Due to my love of making journals, I decided to set myself a challenge and see if I could make a workable journal with only the contents of the bag.

I started out with two pieces of recycled card, which along with paint were the only external additions, and I measured the cardboard to the size that I wanted the journal to be.  This was also dependent on the size of the biggest piece of paper within the paper pack.

measuring out the cardboard
After I had got the size that I wanted, I began to cover the cardboard in strips of paper from the pack, which would provide a base for the flower and any other additional decoration on the front.

I put together the pages and made 3 signatures for the journal, decorating each one as I went along.
Signatures being decorated before stitched
 With any spare paper left I made tags and a front pocket for the journal, I had placed a series of encouraging statements on the tags


I kept the sewing of the signatures very simple and with some of the shiny paper left made some paper beads to hang from the spine of the journal

paper beads and a simple stitching on the journal
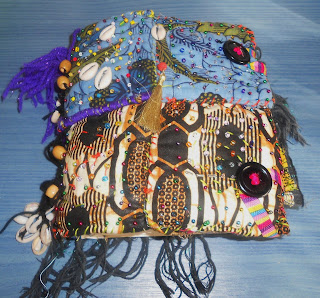
 Here is the finished journal, I decorated the flower with a pearlesent paint and attached it to the cover, and finished off with stitching around the edges of the journal.

Completed journal
 Here is one of the pages within the journal that I have worked on, with a reminder that you need to take a break and dive into your creativity.
Completed page - take a break

I still have a bit of the paper left and that will go towards the next project, I also didn't get to use the beads, so we will see what we can do with these as well.  Try and get on down to your local store and see what paper packs you can find to make a journal from, that are inexpensive and encourage you to stretch your imagination as you use a limited range of resources in a different way. 

 I will be making a few more of these over the coming months, and towards the end of August next month I will be making another journal from the contents of one of these paper packs and also be hosting a giveaway, so keep an eye out!

Join me next week for Tutorial Tuesdays and see where your creativity can take you!!


Monday 28 July 2014

Material Mondays - Fabric Dolls Part 2

 Material Mondays - Painted Fabric

It always amazes me how quickly time flies - they say especially when your having fun, but it has been quite a busy week that saw most of my posts fall by the wayside, but not to be deterred and getting back on track again, finds me with the second doll.

In Last week's Material Monday I shared with you a doll that we had been shown how to make by Susana Tavares on the Soul Food course.

Well I made another one, in exactly the same way, but for a different use.  
Crochet flower and button detail

It was a very simple pattern, which you decorate with your choice of paints before hand and then put the pattern together and sew.

Once this has been done you can decorate however you choose, or leave it as is.


I really enjoyed making the doll and I kept her face fairly simple.  I added a crochet flower and band for her hair, which is wool.  I attached the hair in the same way that you would create a rug - by attaching to her head a simple crocheted hat I then hooked the wool around the spaces on the hat.

I got the bangle from the charity shop and it made a lovely choker, and I crochet a few rows together and made her a belt.

She wasn't happy until I made a bag for her to carry around with her, and this was made from scraps of material sewn together to create a bag journal

Handbag that doubles as mini mini Journal - for quotes!

It is usable and I thought that I would create a booklet type bag that I can use to write down inspiring quotes
Journal Bag

With an additional slot to hold some mini tags!
Mixed media Art Doll

Here she is ready for action.  I would love to see what you can come up with, they are so easy to make and can be given as gifts.  I have an idea of making some smaller ones, she currently stands at 14 inches and is 7 inches wide.  I hope that you've been inspired, come back for Material Mondays to see what I make next week!

Monday 21 July 2014

Material Mondays - Fabric Dolls

 Material Mondays - Painted Fabric


I have always loved looking at the many designs and varieties of fabric dolls.  As part of the Soul Food course over at Community Thrive.  I am still making my way through some of the lessons, and savoring the inspiring teaching.  Artist Susana Tavares showed us how she makes her dolls, and I gave it a go and came up with a couple of designs, one of which I will share today.

Mixed media art doll

It has been great making this one, which I first painted then cut out the pattern and sewed together.  I have made a few additions and she decided that she would be and ideas doll.  Her purpose is to hang around with a note pad and pens and be there when an idea strikes me so that I can take out the pad and write it down. 

Pocket created in the back to carry notebook and pens

To her back I put a couple of pockets that could hold a mini journal and some pens.  The pocket was recycled and painted from one of my sons old school uniform trousers.

Jeweled out with accessories
Her hair and head dress was made from wool and crocheted flower headband - it kind of reminds me of the 80's style


I made some simple earrings using beads and jewelry findings, and picked up a necklace and broach at the charity shop.

Weighed down with stones
I used small stones to weigh down the doll so that she would stand up, though you can use rice or other grain.


She likes going everywhere, and I thought that I would spend some time in the garden getting some inspiration, I might have to make another one to keep her company, and a few smaller ones with encouraging words.  Come back next week for Material Mondays to see what I make out of fabric  Check out Susana's site, she has lots of other things that will be a feast for the eyes and may be inspire you to create.  

Friday 18 July 2014

Gratitudes and Celebrations - Week 52 - Celebrate how far you have come!

Gratitudes and Celebration - Celebrate how far you have come.

Approximately 52 weeks ago I decided to start a Gratitude's and Celebration journal, to capture and remind me of those things that I was grateful for within my life.  I shared with you how I made the journal and in the first week talked about 'letting the love in'.


The Gratitude's and Celebration Journal has served as a reminder to make the most of each and every opportunity.

It has been great working in a small way creating art on each page, and it has also made me focus on what was really important and what mattered in my life.  I have had my share of extremely sad times, as well as moments of joy, and all experiences there for a purpose and allow us to grow.The Journal has carried me through each and every week!


In everything, above all everything I choose to be joyful, and carry that joy with me everywhere I go.  While this is the 52nd week I have decided to continue with the journal, as I still have quite a few pages left to fill.

There is still so many things to be grateful for, I hope you continue to join me on the journey, and start your own Gratitude's and Celebration journal and spend time reflecting on where you are going.

Celebrating Joy

Tuesday 15 July 2014

Tutorial Tuesday - Creating with Washi Tape and Buttons!

Ever busy in my creative activities I had a couple of products from Fantastic Ribbons to review, which consisted of a packet of their Candy Buttons, in assorted colours and some washi tape from their Pastels collection. It has been great to use both of the products in creative activities and I will be sharing what you can do to incorporate both of the products in different pieces of work.

I started out with the Washi tape and, I have used it in two mixed media paintings and a wall hanging.


The pink and blue washi tape was used in this painting called "Why Not", on the neckline of her top and with paint and stamps blended in with the rest of her top.


I used some of the washi tape in this painting called "Honouring your Story", I applied the tape in random places to add colour before the addition of acrylic paint and inks. It is great using different types of patterned paper within the paintings, and it adds different dimensions to the pieces without being too bulky.  

Wall Hanging
With the wall hanging it was great to be able to keep it simple and allow the colours of the washi tape to show through.  I had these wooden circles and covered them with the washi tape, then embossed it with embossing powder.  


With the bottom panel I added two strips of washi tape with the butterfly made from Fimo clay and then painted to match the pink in the tape.  I then added gel accents in gold to the panels.


With the buttons, I went overboard, there is so much you can do with buttons.  the colours are great, bright and fun and really bring your project to life.  Here are some of the other projects I made:

Fishes
I used some of  the buttons as decoration on this fish.  I shared how to make them HERE and the fish has two looks depending on its mood.  Using some painted fabric I cut out, sewed and filled a mini fish shape, added the tail using laces and then used stitching and beads to decorate.  You could make a mobile for a kids room or put an encouraging word on it and put it in a prominent place:)

Wrist Cuff
I made a crochet wrist cuff with the buttons, decorating it with a flower.  I had added the buttons and it showed the pattern well with the silver flecked wool of the main parts of the cuff.  A larger button served as a clasp.  This took around a couple of hours, and you could mix and match with different wool and designs.

I have had these mini Dollies for a while and arranged the buttons on the Dollie and stitched them together. I think that it will make an addition to another project such as a fabric journal.

Quirky Doll
My final piece was this quirky doll.  

The doll is originally made from two crocheted flowers that had been sewn together, and decorated with buttons from the Candy range alongside acrylic gems.  there were some lovely buttons in shades of purple that I was able to use to decorate the doll.  I attached a mini hat and eyes and the shoes are made from green and pink buttons.
Quirky doll
So as you can see, several different activities from a couple of products, there are lots more that you can do with them if you put your mind to it!  When you get a chance check out Fantastic Ribbons  and see what you can find to spark your creativity, and allow your mind to run free with some of the delightful products in their range.

Sunday 13 July 2014

Word for the Week - Psalm 120

Word for the Week - Psalm

I call on the Lord in my distress and He answers me
Psalm 120:1


Friday 11 July 2014

Gratitude's and Celebrations - Are you ready to live - Week 51

Are you ready to live the life you have been given?

I have a big birthday coming up in a couple of months and as I think back over the years I think about those things that have made a impact in my life.  There are some sad moments that are mingled with happier times.

How many lives have you touched?

Most of all I think about the fruit that has come from my efforts, and wonder how many lives have I touched, did I make an impact in someone else’s life, and what do my achievements mean.

You can spend your life thinking about what you should have done, could of done and when tomorrow comes all the things that you are going to change, but when the time comes you give another reason why you can’t start just yet.


Watching my son grow up and finish his exams, and each and every day becomes a young man who is getting more and more independant I am reminded that I can’t wait until tomorrow, I have to do what ever it is today, I have to make those changes today, I have to step up and do something different today, because tomorrow might not come. 

Are you ready?

I am ready, as I approach another year, to live the life I have been given right now, not make excuses of what I should be doing, but experiencing growth, joy, happiness, along with everything else that comes with it – even pain.  I celebrate and I am grateful for this life, and look forward to the many adventures that await.

What part of your life do you need to kick start and how you going to do it?

Wednesday 9 July 2014

Cat ....at the end of the Garden

The Painting starting out

My neighbors cat for some reason prefers to sit at the end of my garden, and he brings his friends along to sprawl under the palm tree, as if they are having a conference!. 


Every morning he strolls across the grass, after spending the night chasing mice and other things and gazes at my plum tree where I have the hanging bird feeder, hoping that one of the many birds that feast on the nuts and seeds would slip up and provide him some breakfast - as he waits to pounce on them.
He switches his tale backwards and forwards, until I open the garden door to shoo him away, surprized he makes a bolt for it to his own garden, caught in the act.

Other times you will find him stretching out on garage roofs, climbing walls and darting in and out of the hanging plants chasing the butterflies. 

But every now and again he sits on his window ledge, watching the world go by, I think that he secretly has dreams of making his escape much further afield than my garden and into other neighborhoods. But there is no time to dawdle evening comes round and the day dreaming takes a back seat to the coming adventures that await his night time pursuits.


Cat - Mixed media Painting

Related Posts Plugin for WordPress, Blogger...