Showing posts with label tutorial tuesdays. Show all posts

Sunday 5 January 2014

Learning - Creating in Faith


Your life is your message to the world.  Make it inspiring...Lorin L Lee

Learning

Learning comes in many shapes and forms in a formal setting or non formal and every day we are learning new things about ourselves as we reflect on our lives and experiences.  How have you done so far with all the things you said you were going to do at the beginning of the year?  Granted it is only the first week, but you need to hit the floor running, or perhaps you already have and all we can do is look at your dust as you whizz into the distance...

‘For I know the plans I have for you’, declares the Lord, ‘plans to prosper you and not to harm you, plans to give you a hope and a future – Jeremiah 29:11

Organisation

I am currently surrounded by lists and schedules as I slightly run after myself in doing the things I want to do.   I had a great flurry of action towards the end of last year and now in the New Year schedules are still to be finalised, courses have started and I am wondering where the week has gone so far.  I am mindful though about keeping up with all the things that I have committed myself to do and in the midst of it still enjoy the process.

God had planned something better for us so only together with us would they be made perfect... Hebrews 11:40

Having made the decision to cut back on my posting for Tutorial Tuesdays, Material Mondays and Recycled Projects, I will be sharing what I have done in the classes and what it may have brought up creatively for me.  I am also looking forward to the growth and the insight which should come with learning new information.  I already know that I resonate towards more structured way of working.  I like knowing what is planned for the next week and what I am working towards.  It stops the wandering from one thing to the next as you get more and more distracted.  I learnt that I need to just go with wanting structure among the spontaneity of the creative practice.

Creative Sundays

Next week Sundays will see the beginning of my Creative Sunday’s posts – Expressing your creativity in a spiritual environment.  I look forward to sharing each week and producing a video of the process – as part of getting myself out of my comfort zone and moving forward.  My word which I shared for the year is ‘Attention to Detail’ which for me will require me to be more focused and disciplined as I am asking a lot of myself this year.

Commit to the Lord whatever you do, and your plans will succeed..Proverbs 16:3

Attachments

I am also learning about my attachments and my ‘you never know when you can use it’ mindset, we are spending time over the next few months to declutter the house.  My husband is more ruthless and when we talked about it last year I was all fired up caused it seems so far away.  This weekend he went and got the boxes and made a start and I have found myself justifying why it is alright for him to get rid of his things but some things (all of my things) need to stay.  I am realising the more I have been thinking about it that there are some strong emotional ties that I will need to deal with alongside the excuses that are already preparing themselves at the back of my mind. 

Last year I did a 30 day de-cluttering challenge and so I know that I can do it I guess admitting how I feel is the first step to moving on,  and there is a limit to how many books you can hold onto and read, or how many clothes you can keep, although since starting creating recycled projects I find a use for quite a lot of things, mainly boxes, packaging which I will have to limit or make sure that what I make goes to a good home (am I justifying again??).  

Making the way...

At the end of the day I know that I have done it in other areas and I will have to just work through it.  I know that God has much more for me this year - there are new adventures to experience, new environments to be in and new things to learn and sometimes you have to let go of things.  You can’t take these things with you, you have to make the most of them while you are living and share what you have with those who are in a less fortunate position.  

Let us step into 2014 knowing that we did all the things that we needed to do, we stretched ourselves, we were more than we were last year and we made a difference in the life of at least
one person.  

What are your plans for 2014, where are the changes going to be made in order for you to move forward?


Psalm 121 1-4– I lift my eyes to the hills – where does my help come from? My help comes from the Lord, the Maker of heaven and earth.  He will not let your foot slip – he who watches over you will not slumber; indeed, he who watches over Israel will neither slumber or sleep

Tuesday 31 December 2013

Happy New Year and Tutorial Tuesday!


HAPPY NEW YEAR!

Better late than never, I wanted to start out by saying Happy New Year and wishing you a blessed year filled with peace, growth, insight, understanding and much love.  This is my last post of this year and Tuesdays are usually filled with tutorials.  I shared in yesterdays post the changes that will be happening, I am taking a few courses that I hope will bring new knowledge and change will come through in my work.  I want to step up and do more.  I don’t make new year’s resolutions but build on the plans that I made this year which will carry through to next year.

One of the changes that I will continue to work on is my health, getting fit, getting rid of clutter and making sure that nutritionally I have a balanced diet.  I am going to continue to clear the clutter and we are all going to make a big effort at home to get rid of those things that are just there ‘because’ rather than serving a purpose.

Rather than weekly to fit in the new courses I will be posting Tutorial Tuesdays on a monthly basis.  I will have lots to share from the insights and techniques gained on the courses and wanted to make some room for this.  I will be trying my hand at videoing and will try and do some video based technique videos.  There are so many things that I would love to do that there isn’t the hours in the day, but I will try and do a few of them.

If you want to take a look at the past tutorials click on the link below and it will take you to the topics.  
Tutorial Tuesday

I hope you find ways to experiment and learn new things in the coming year.  As always share what you are doing and remember to be a blessing.
Happy 2014!

Tuesday 17 December 2013

Tutorial Tuesday - DIY Washi Tape - using Masking tape

Tutorial Tuesday

I have been playing about with making my own Washi Type tape, using masking tape, and here is some I made creating a variety of different designs


Here is a journal that I used the tape on and created a series of layers for the cover.

 I got a sheet of plastic and a roll of Masking tape about 11/2 inches thick
 I spread out strips of the tape on the plastic sheeting
 And then selected some paints to use on the tape.  Here I am using inktense blocks and art bars.
Once you have painted each of the strips with a layer of colour to suit you let it dry
 I then chose a selection of stencils and stamps to each of the strips of tape
 You can put as much pattern or as little pattern as you like
 I have used some paint with these ones and then applied glitter
 And with some of them I kept it more simple

Once done I covered some card and an empty foil roll with sellotape and then wound it round each.


Tuesday 10 December 2013

Tutorial Tuesday - Mini Frames

Tutorial Tuesday

Tuesdays' Mini Frames
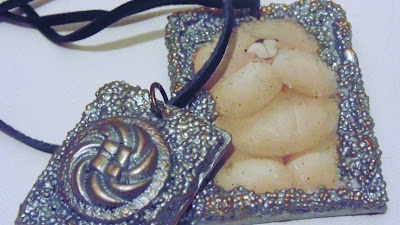
I made a selection of mini frames at the end of November alongside some that I made into necklaces and I thought I would show you just how easy it is to create your own, from recycled materials that you probably have laying around your home.  Here is another look at the selection that I made, but you can check out the post HERE


You can create any size that you want, but I guess the small ones have a cuteness to them!

To make your own you start with the following tools.

You need cardboard from any packaging you might have laying around, 
selection of interesting images from magazines, 
handmade embellishments in a variety of sizes, 
glue, paint, 
jewelry findings - if you are going to turn it into an item of jewelry
Cardboard being recycled for a creative project
 Cut the cardboard to the required size, and select the image or embellishments that you want.  Mine measure 2 inches x 1 inch and the one with the circle embellishment measures approx 1.5 inch x 3/4 inch
Use whatever paper you have available
 I covered both sides of the cardboard with paper first,
 a couple of layers should do, then let them dry
You can use gesso or paint of choice
 Once dry, coat them with gesso, again a couple of coats and leave to dry
The stamp is for the back of the project to add interest
 I stamp the back of mine as I am going to make them into jewelry, using the stamps I made in a previous post HERE
 Once the ink has dried, give them a coat of pva glue and this will seal it.
 Attach you image to the front.  The embellishment was made using clay, painted black and highlighted with goldfinger paste.  The bear image was taken from a catalog.
Applying the glue
 Applying glue around the embellishment and the image I coated them with quinoa (which had passed its' sell-by date) and allowed them to dry
 As the embellishment was raised I applied a second coat of glue and then another coat of quinoa

 Once they had dried I coated them with paint in pewter which gives it a metallic look
Inexpensive jewelry - one of a kind
Completed necklaces with highlights of goldfinger paste.  I attached a finding and faux leather thong! 

I hope you have a go and let me see your results.  You can try using a range of materials that will give different textures and look to your project, and also try different shapes. Do have fun and share your results.  Until next week!


Tuesday 26 November 2013

Tutorial Tuesday - Tea Bag Treasure Box

Tutorial Tuesday

Where will your imagination take you?

It is surprising what you can do with an empty box an a bit of imagination.  As part of the recycled project on Saturday I shared with you the Teabag Treasure Boxes I had made, from the empty box once it had finished, here is the selection that I had made previously.
Selection of Tea boxes made into treasure boxes

Today I will be showing you how you can decorate your own box using a few simple techniques.  What you will need:
An empty tea box (or any box you have to hand, paper of choice, gesso or paint, stamps, embellishments of choice and imagination! 


Starting off with a box

Taking a box of your choice - this is one of my favorite teas and I do go through quite a few - it is spiced tea with a blend of ginger, cardamon, black pepper (yes) and a range of other things, it is absolutely delicious with some sugar and rice milk.  It is similar to Chai, but a bit more spicy, but that is for another post...

Cover your box in your paper of choice, this will help make it more sturdy.  Here I have used a brown paper bag.  I spritzed it with water which made it easier to scrunched it up which will add texture to the box.

As I applied each piece I have covered it pva glue and then allowed it to dry.
Once covered and dried your on the home stretch!

The box sets quite hard, I decided to keep my box open and then I painted it with gesso, allowing some of the colour of the paper to show through.

Add an encouraging word with lettering

I stuck on some letting - the word 'Create' and on the inside of the lid using handmade stamps I stamped a heart and added stamped flowers around the outside of the box..
Home made stamps used in decoration

I applied glue from a hot glue gun around the edges and around the heart.


To finish off I added some goldfinger metalic paste to the edging of the box and around the glue and it gives it a worn grungy look.

I attached one of the 'teabags' from the teabag treasure tutorial post I did last week.  You can cover your box with pva glue to seal it and then your ready to go and use it


I look forward to sharing next weeks project with you.

Tuesday 5 November 2013

Tutorial Tuesday - Handmade Stamps

Tutorial Tuesday

Handmade Stamps

I shared with you on Saturday the Handmade stamps that I had made out of sleeping bag mattress foam, and here are some that I made,  It is really easy to create your own stamps and I hope you have as much fun as I did in coming up with your own creations.

Stamp collection made from foam

Get yourself a piece of the foam, this one is approximately 1.5 cm thick. Cut to the size that you require.


I cut mine 3x3 inches as this fits comfortably in the hand and is easy to stamp

Select tools that you are going to make marks, shapes and patterns with
Selection of tools to make marks on the foam

Look through some magazines, books, textiles or around your home for inspiration to create a pattern, I chose this heart paperweight.

Once you have chosen your pattern and shape, cut to size begin to mark the foam as required

Cut a piece of card that will act as the backing for the stamp, I covered the edges of mine with home made washi tape (will show you how I made these in a few weeks:)

Cut a piece a paper the same size as the cardboard and stamp your design onto it.  Stick this onto the back of the cardboard,It will act as a guide to the stamp.  


Stick your creation onto the other side of the cardboard, and let dry

Your stamp is ready to be used!

Do leave your comments and share with me what you decide to create! 

Related Posts Plugin for WordPress, Blogger...