Showing posts with label recycled materials. Show all posts

Monday, 15 April 2024

Fabric Art and Slow Stitching Projects - Material Musings


Welcome to Material Musings, where we embark on a journey through the exciting world of fabric art! From exploring various fabric products to delving into inspiring books for creative sparks, there's so much to discover together.

I am currently immersed in several fabric art projects, and we will be choosing a few to work on over the next couple of weeks. I will be adding some additional stitching and also going though my bead selection.


Check out the video above and I have included time stamps in the video description to make for easier viewing.

Check us out on the FREE membership on Patreon for some tips for you to consider while on the stitching journey: - Check it out Here

Embrace Imperfection

Don't be afraid to let go of perfectionism: ....Learn more Here

Experiment with Texture

Explore texture in your fabric art by: Learn more Here

Before You Go

Here are some of the other projects and resources mentioned for you to take a look at

Dragonfly stitched project - https://youtu.be/8Zody9EG9Z4

Red Bead Stitched Project - Part 1 https://youtu.be/aiqsmpk8D8s Part 2: https://youtu.be/PsHo0cntWIE Fabric Kits/course to purchase: https://realityarts.thinkific.com/courses/fragments

The Ultimate Flower Book - https://amzn.to/49FS2To

Creative Applique to Make and Wear - Hardcover - https://amzn.to/3JqmVR3

Stitch inspiration: Bianca Springer @thanksimadethem on IG or https://biancaspringer.com/ I am teaching - Check out my FREE Courses HERE - https://realityarts.thinkific.com/ Thank you for joining me in my art studio. We all have 5 minutes that we can give to creative play, why not see how you can fit creativity into your every day Subscribe Here http://youtube.com/amandatrought For More inspiration please visit my Patreon page HERE. https://www.patreon.com/realityarts

Check out Bianca Springers Book 'Represent - Embroidery' on Amazon HERE

Check out her Blog too HERE


Wednesday, 18 January 2023

Creating a Recycled Art Journal - Use those Catalogues!

Welcome to my latest art project where we will be creating a recycled art journal using an old catalog. 


This project is quick, easy and affordable, and the best part is that nothing will be wasted!  You get to use some of those store catalogues that you have been collecting and create some wonderful projects.


To start, find yourself an old catalog, like this Tesco's home catalog that I'm using. The first thing you need to do is rip out about half of the pages. This is because we'll be adding collage and texture to the pages, so you want to make sure you have enough space to work with. Go through the catalog and rip out every 2-3 pages.  I save the ripped out pages to use later.


Once you have removed the pages, stick together sets of 2 or 3 pages depending on where you ripped them out. Allow the pages to dry and then reinforce the spine with some masking tape on the inside.  If you are going to be adding paint it stops any bleed through on the other pages.

I also add masking tape to the edge of the pages that I have stuck together This will also make it easy to turn the pages.


With the pages left over, look through them and cut out images or words that speak to you. I select colorful patterns and shapes and these will form part of your collage. This is a great way to still create something without having to have a lot of art supplies or anything fancy. All you need is a catalog, glue, and some basic tools.


Come and join me in the next video, I'll show you how to work on some of your pages, and ideas from other recycled journals that I have created. This art journal will be a space for you to fill up over time, write down your thoughts, and enjoy the creative process. It's all about play, so have fun with it!

*************************************************************

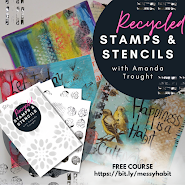
If you would like to take it a step further and make your own stamps and stencils, then check out my FREE online course Recycled Stamps and Stencils where I show you how you can take items that you may have around the home and turn it into something that you can use in your art journals. 

You get a video on how to create the stamps and stencils, a digital download of the stamps and stencils that I created, background papers and more!  Check it out HERE


Monday, 11 July 2022

Material Mondays - Working with Fabric Pens


Welcome to Material Mondays this week where we look at working with Fabric pens to create designs on our fabric pieces.

You can use them as a layer on your fabric or as a finishing touch.  I like to add stitching as well as other elements.


I share with the a selection of fabric pens that I use, they come with different nip sizes for different effects that you may want to create on the fabric.


Amazon has a wide selection of fabric pens that have dual uses - you can check some of them out here - https://a.co/bNs0Iya

Material Mondays

You can also check out some of the other videos in the Material Mondays Series below.

Week 1

Week 2

Week 3

Week 4


Check out the free resources listing in the side bar of the Blog and sign up for one of the FREE courses.


Monday, 30 May 2022

Free Mixed Media Art Resources


Check out the Free resource - see a host of Free Resources and information for you to access, including digital and audio downloads, course information, book, product reviews, discounts and offers. You can check it out on my course platform - Click on the link HERE


Art Tags FREE Mini Course


A set of 7 art tags designs that you can add your own flair to. In the videos I share with you some hints and tips More information HERE

Recycled Stamps and Stencils Course


Do you want ideas for creating your own stamps and stencils from recycled materials, in this mini course I show you a series of examples using recycled materials and create a couple of art pages.  More information HERE

********************************************

Mixed Media Art Courses to Check out


Wednesday, 1 February 2017

Toilet Roll Journal 2 - 31 Creative things to do with Recycled materials


So you got some more toilet rolls hanging around, lets see what else you can do with them.....simple...create another journal, a bigger one this time!

Toilet Roll Journal 2


Recycled Journal

In 31 Creative things to do with Recycled materials I have been showing you different things that I have made that you can try for yourself or a project with children, as a gift, that can impact where you live, your environment and more - you know it!

This journal came about in a very similar way to the Journal I showed you yesterday and you can see just how I put it together HERE.

On the front of the journal you can see that I used Quinoa to decorate the front, again using something that you may have in your home supplies that you might ordinarily throw away. Think about the different things that you have that can create texture or add something different to your project.

Front Detail - Toilet roll journal


back detail - Toilet Roll Journal


These pages were constructed differently to yesterdays one and I made it slightly bigger, and enabling me to increase the size of the tags that I made.  If you want to see how this one was made you can check out the post HERE

I think that these journals are so cute, remember if you are using foodstuffs to varnish it and seal it in well.  If you can come up with alternative uses why not leave a comment, let me know how you get on.


I will doing an ‘All About Journals’ Challenge on my YouTube channel where I show you how you can make your own journals from recycled materials such as catalogs - you can see what I did with a John Lewis Catalog, old books, and more – whether you are re-purposing, reusing or altering, you can make something that is unique to you. Sign up to my mailing list HERE and you will be notified when the videos go live.


Tuesday, 31 January 2017

Toilet Roll Journals - 31 Things to Create with Recycled Materials


Toilet Roll Journal 1


Cardboard arts and craft activities are great ways of making things that not only children can enjoy but also adults as well.

I found a great way of using something we have around us and use every day and these often end up in the bin. I started looking at these as a possible craft addition when I saw some of these Craft Ideas on Pinterest I ended up making an art journal, with inserts that you can use for tags and special notes I shared how I made this Journal in a post HERE   I will be doing a video so that you can see all the contents and the different tags.


It was a joy to make once you have worked out just how the journal will sit, and the different sections I wanted. It all began to come together and once again I was able to utilize all the smaller tags, cards, papers and embellishments that you see on the inside of the pages.


Join me tomorrow where I show you another Journal Making idea from Toilet tube roll and whether you are re-purposing, reusing or altering, you can make something that is unique to you. 


Stay blessed and be a blessing!

Monday, 30 January 2017

Art Journal - 31 Things to Create with Recycled Materials -


John Lewis Journal

I picked up a while ago a John Lewis catalog after a visit to the store with my sister. I had also joined their loyalty program and received my complimentary tea and cake voucher, which they send out I think 4 times a year – which was yummy by the way (everything in moderation)!

Recycling can come in all shapes and forms and as you would have seen over the last few weeks if you can think of a creative problem or something you need to make you can probably use a majority of the things you have around you.

After looking through the catalog it sat around my house for over a week. I thought of some of the things that I could do with it and making a journal was what I really wanted to do, but I wanted the kind that you could use the background images as a place to start, and you could also completely go over the page with gesso and create your own image. 

John Lewis Journal - Recycled creatively

What I liked about the pages was the feel and the thickness, it holds gesso well, and it had some interesting images, and this allowed you to add to the image using art supplies. 

Page to add gesso to
So where you say have an image of a bed,
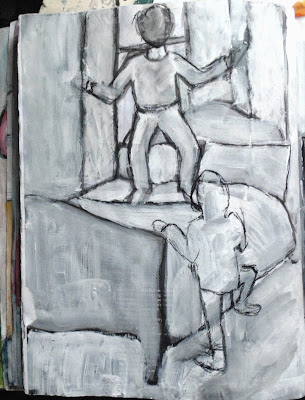
Were you allowed to jump on your parents bed?
I added to it and drew in children jumping on the bed, something we were never allowed to do as kids.  With each stage a part of the process you can enjoy the separate parts or the whole.  An enjoyable exercise was to block out some of the picture for the next stage, adding gesso and a bit of colour and then adding a figure

Here are some other ways in which I altered the pages, I enjoyed placing the characters within the picture and thinking about what their story was.

Some stories tell of hope and looking to the future.....


thinking about the past, and being present.......


So now I have a set of great pages at different stages that I can use when I have time to spend finishing off a piece

Why don't you check out your local store and their catalogs, you might find one that you will be able to use as your own journal. Here is my original post that will give you a closer look at some of the pages.

Sunday, 29 January 2017

31 Creative Things to do with Recycled Materials - Tea Bags

Teabag Treasures 


Tea as you know like many people is something I usually drink every day, and I have my favorites that I like. Every now and then we buy a different variety tea, and for some reason or another no one in the house wants to drink it and it passes the sell by date.  Now I am sure you can guess what is coming next…there are so many things that you can do with an empty unused tea bag!  They are really versatile, and I will show you one of the ways in which you can put them to good use.

The tea bags by the way can go in the garden and depending on the bag decompose quite well (great for roses I hear). But you want to make something creative with them don’t you?

Tea Bag Treasures


Check out my post HERE for some step by step instructions. With the bags I have I enclosed them with words of encouragement, added texture and paint. On these ones I added the quinoa – I had so much (again out of date) to get rid of! 


They were then painted and an embellishment made from either fimo clay, or shrink plastic and then it was added to the bag.  Again, with those little bits of broken jewelry you may have laying around you can bring new life into them and add some sparkle. There are countless possibilities using the altered teabags in different projects, check out my Pinterest board to see some of the ways that I found that other artists are using. 


Can you see a creative possibility in more things now? 
There are so many things you have around you are screaming to be altered, reused and re-purposed, and I often tell Alan and Sekani that if they stand still for too long around me I will be seeing if I can find a creative use for them as well (smile).  There are a wealth of possibilities when we experiment with recycled materials, come back tomorrow to see what else I have got up to with my supplies.

Why not join me on some of my other platforms, and sign up to my Mailing list you will be getting information about what I am up to in my creative journey, tutorials, Arts and health advice and resources, giveaways and more


Stay blessed and be a blessing

Amanda

Saturday, 21 January 2017

31 Creative Things to do with Recycled Material - Tea Boxes


Tea Boxes Decorated


What are you going to do with your empty tea boxes that you have, throw them away, recycle, put them in the compost or do you make something from them? Yesterday I showed you a way to alter them and make something crafty, here are a few other ways.

Always one for experimenting I wanted to see how many different ways the tea boxes could be decorated based on some of the supplies that I have. Whatever you have in your craft supplies there are some amazing techniques to try.


Here are 4 ways that I decorated mine so far, this is a great way to use up some of those smaller pieces of your supplies – paper, embellishments that may be too small for one of your larger projects but may be just right for this one. (No it isn’t an excuse to start to hoard, though it can sometimes feel as if you are surrounded by a mound of ‘use it for later’ supplies).

I will be doing a series around the tea and tea boxes, so watch this space, and even follow along. I might even do a monthly tea box challenge with some giveaways each month!

So for the boxes I covered this one with handmade paper, brads and topper that was a free decoupage topper form a magazine. (You can make your own decorative paper with painted recycled paper. I then tool string and beads to decorate the front, and stamped the inside with a homemade stamp.

Quinoa Box

When I had loads of outdated quinoa, I wanted to use it to make a creative covering for the box and applying glue sprinkled it all over and let it dry. I then finished off with broken jewellery, ribbon and another homemade mini box.

Friend Box


Covered with stamped masking tape and glitter paper, with a tag on the top with the stamped message of friendship. I also used a clay embellishment on the top.

Sequin Box

This has handmade paper, paint, sequins and an encouraging word tag on the top. If you keep the embellishments simple your box will last longer and be more sturdy. It is great fun having these decorative containers and it would be great to do a series.

You can see how I went about altering the boxes HERE

Perhaps you will join me with the monthly makes and you can sign up HERE if you want to know when a new one is coming.

Friday, 20 January 2017

31 Creative Things to do with Recycled Materials - Spiced Tea Box

Spice Tea Box Container

Great ways to alter your teabox!

I did a post about this container showing you how to alter it as it utilizes a product that I use quite a lot and that is tea. 

Recycling at its best!
I have a least two cups of Spiced tea a day, the morning ‘wake me up’ to get myself in the work frame of mind and the 'afternoon reflection', the tea has such a delicious taste, I will be sharing at some point about some of the other tea in the Palanquin range.

Over a period of time I got through so many boxes that I thought it was time to create something out of one of them.


I kept the structure of the box with all its parts as I didn’t need it to close but to house supplies that were quite tall, such as paint brushes and things that I use on a regular basis. 

I used brown paper on the box to get the texture and then added gesso it.  You can see instructions HERE


Sitting on the desk I also wanted a reminder of why I was there, and that is to create, and added encouragement with a ‘teabag treasure’ - what do you do with those teabags that are out of date? (you’ll find out about these soon).  

Choosing the lettering
There are lots of great ways you can use these boxes and I will be sharing some more ideas.  

Tea Box Treasures - Amanda Trought - Realityarts

Again, a great way to use recycled materials, for your own space and they can make lovely gifts and you can add your own style.  Join me tomorrow for another creative recycling idea.

For more inspired recycling ideas and useful tips check out Zero Waste Barbados and Journey to Zero Waste

Have a look at some of my ideas on my Pinterest Recyled Board


Stay blessed and be a blessing!

Thursday, 19 January 2017

31 Creative Things to do with Recycled Materials - Alcohol Marker Holders

Welcome to today's post showing you 31 Creative things to do with Recycled materials.  Even after the challenge has finished I will continue posting until you have seen all 31 examples, as I had things that got in the way, but we move forward!  

When I make something out of recycled materials I get a real kick, knowing that I have created something that I want, worked out how it needs to be put together, and so been resourceful, and also that I have created something that has another use from its' original intended form.


After I had made the first free-standing pen holder, there was nothing stopping me from making another one. I allowed some of my supplies to dictate slightly how it would look. I really loved the way it turned out and it means that my pens do not have to be stuck in a draw taking up valuable space for something else.


This storage container was made from almond milk and juice cartons, along side cardboard. I worked out the height and width that I wanted and the amount of storage I would need.

The cartons are made from a durable waterproof material, and they don’t readily get recycled here, so I knew I needed to find a way to use them rather than throw them away in the bin, (honestly I am not a hoarder). I think there has to be more government initiatives and more of us have to think about just exactly we are throwing away and use less packaging where possible. What if your rubbish was put in a hole in your back yard, you’d soon run out of space and who would want to live with that, you would soon find a use for more things that you ordinarily throw away. 


Once I had all the dimensions that I needed I put it all together, using one of my favorite tools - my glue gun, and the plaster fabric and painted. And there you have it.  I think it is quite cool!  I am debating whether I want to put an image on the side, perhaps someone with a story wants to come forward and grace the side of the pen holder.


For now I think that they look great in my space.  If I do decide to decorate I will share it with you.  It would be great to see what you come up with using recycled materials, tell me which one has been your favorite so far.  

For more inspired recycling ideas and useful tips check out Zero Waste Barbados and Journey to Zero Waste  
Have a look at some of my ideas on my Pinterest Recyled Board

Tomorrow I will be showing a spicy alternative!

Stay blessed and be a blessing!
Related Posts Plugin for WordPress, Blogger...